Tuesday, January 25, 2011

So far, so good…


Ok, so it’s only the third day of my 365 project, but I’m feeling pretty good about it so far. I was afraid I’d have difficulty coming up with new shots and not just shooting around my apartment on days when I don’t go hiking or biking. It’s been easier than I expected so far.

The first day I managed to catch the sunrise and took a nice shot of that. Yesterday while running along 48th St., I saw a cool shot and was able to capture it on my iPhone. Today at work, I saw a cool shot and grabbed my Canon PowerShot SX120 IS. I always keep the PowerShot with me when I go to work because there had been times in the past when I wished I had a camera on me, but wasn’t about to start taking my dSLR with me.

So three days – three different cameras – three very different photographs. I think 365 is manageable. Keep up with my 365 project on Flickr here: http://www.flickr.com/photos/9143496@N03/5388276007/

Sunday, January 23, 2011

365 Project – Arizona Skies


When I first moved to Arizona, I took many pictures of the landscapes near my home in Mesa. This was before I became really serious about my photos. One friend made a comment that is the inspiration for this 365 project. She told me to take more photos but include “more of that gorgeous sky!”

She was absolutely right. The sky here is fantastic. Part of the reason is that there are very few trees to block out the sky so you get to see more of it. The other reason is that it’s so dry that the sky tends to be a really clear, deep blue color. When there are clouds, they are generally very dramatic looking.

Another reason I decided on the sky for a subject is that I am starting this on my birthday. I am an Aquarius, which is an air sign, so it seemed a bit fitting.

All of the photos in the project will in some way incorporate the sky. Most will have some sort of foreground scene. Of course, I may not be in Arizona ever day for the next 365 days, so there may be a few times that I’ll have to post skies outside of Arizona. You’ve been warned.

My first photo I managed to take this morning at sunrise. Quite fitting – the beginning photo taken at the beginning of the day.

Well, I hope you enjoy the next 365 days!! Click the link below to see the first photo.

Click here to view the photo

Saturday, December 18, 2010

Tackling a Monster


I’ve been slacking a bit in my blogging. I wanted to do it at least once a week, but I’ve been busy doing other things… Oh well, at least I’m here now.

So last week I began really learning Photoshop CS5. Previously, I read most of a book on CS4, but realized I needed to master Lightroom first. Lightroom is definitely the most important program in my post processing. It allows me to stay very organized and gives me the smoothest workflow options.

I learned how to use it by reading Scott Kelby’s The Adobe Photoshop Lightroom 2 Book for Digital Photographers while using a beta version of Lightroom 3. There were some slight differences, but the core functionality was there and it helped quite a bit. If you are planning on learning Lightroom and want a good “show me how” type of book, I highly recommend you get his book for whichever version of Lightroom you use.

When Lightroom 3 was officially released, I picked up Martin Evening’s The Adobe Photoshop Lightroom 3 Book: The Complete Guide for Photographers. His book is much more detailed than Kelby’s and is the perfect supplement to Kelby’s introductory type style. Evening’s style is more for intermediate learners and was perfect for where I was in my knowledge. I haven’t completely finished it, but I’ve read through the majority of the material on processing color photos and feel really confident in my abilities now.

And now my next challenge: Photoshop CS5. CS5 is a huge monster. It’s not just for Photographers. There is so much you can do in it, it’s hard to figure out what I need to use. Luckily, Kelby and Evening both have written books on it.

I just started Scott Kelby’s The Adobe Photoshop CS5 Book for Digital Photographers, and I have Martin Evening’s Adobe Photoshop CS5 for Photographers waiting for me when I finish. Kelby’s CS5 book does not need to be read straight through like his Lightroom books, but I’m reading straight through anyway. I don’t want to miss a thing.

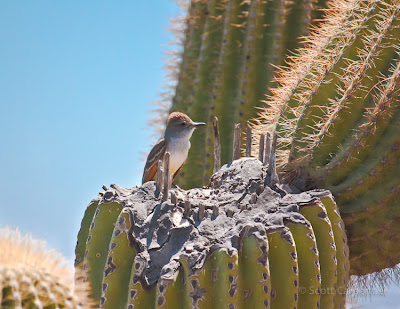
One of the first few photos I worked on is a photo I took in April, 2009. The photo was taken while hiking South Mountain in Phoenix, AZ. It’s the perfect shot of a brown-crested flycatcher sitting on a cactus where the main barrel had been cut away by some means. It’s one of my favorite shots, but I’ve struggled to get the entire photo exposed and color corrected properly. I think I’ve finally fixed it.


Today I began the chapter on HDR, which is something I’ve been really excited to get into. The HDR photos I’ve made in the past have been ok, but I really want to master this very creative form of photography. The first one I made after reading the first lesson is a from my vacation to RI this past October. In anticipation of making HDR photos, I’ve been shooting a lot of photos using the Auto Exposure Bracketing (AEB) on my camera. I took three exposures of one of my favorite shots in Narragansett and it can out really well.


Ok, time to get back to work learning this crazy beast called Photoshop.

Saturday, November 13, 2010

After the rain…


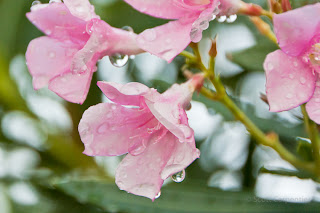
A few days before my trip to RI, we had some really heavy rain for a few days here in Phoenix. On one of those days the rain ended a couple of hours after I got home from work and decided to attempt to shoot some flowers with rain drops on them. I’m sure you’ve seen many photos of that before. These came out ok, but I did struggle a bit with a few things.

The optimal lighting conditions outdoors is typically 30 minutes after sunrise or 30 minutes before sunset. These shots were taken about 2 hours before sunset. I have also read that shooting with overcast skies is almost as good. Well, I definitely struggled with the lighting here. I had to really put Lightroom to work here in order to balance the lighting.

  Canon XSi, Tamron 18-270mm lens, 84mm, f/5.0, 1/100 sec, ISO 640

I was hoping to get some really good close-ups of water droplets, but it proved a bit difficult with my lens. I don’t have a macro lens for my Canon XSi, so I ended up using my Tamron 18-270mm. I love the range of this lens because I was able to get some shots of flowers high up in a tree as well as some on bushes without needing to switch lenses. I’m starting to see the limitations in the quality of the lens, but overall it’s a decent lens. I also put my tripod to good use here, hoping to get sharper shots.

  
Canon XSi, Tamron 18-270mm lens, 119mm, f/5.6, 1/125 sec, ISO 800


My girlfriend came home from work while I was out shooting and she told me about a butterfly what was just sitting on a palm leaf along one of the paths. I went over there with her and it was still there. It continued to sit in the same position for the entire 5 or 10 minutes that I stood around it taking photos from all kinds of angles.

Canon XSi, Tamron 18-270mm lens, 142mm, f/5.6, 1/125 sec, ISO 800

To see the full album, visit the set on Flickr here or on Facebook here.


Saturday, October 30, 2010

Learning the ropes of 35mm


It’s been quite a while since I last posted – almost a month. I think it’s time to take a break from processing photos to update my blog. I have quite a bit of photos to go through since I took over 2,000 shots at Saboten Con, and then I traveled on vacation to visit my family in Rhode Island. I went out shooting every day I was there, so I have way too many photos to go through. I’ve put some up already, but I saved the heaviest shooting days for last.

One thing I did while in RI was take my vintage Canon AE-1 SLR with me. Prior to this camera, I had not shot 35mm film since high school. My dad gave the camera to me late last year and I’ve taken it out a few times shooting. I had three rolls of film lying around undeveloped, so I wasn’t too sure how well I was shooting with the camera. The camera came with a Canon FD 50mm F1.8 lens, but I purchased a Canon FD 35-105mm  F3.5 lens on eBay so that I would have a little bit of range.

So far I’ve only looked at the 24 exp roll that I shot in RI and haven’t had a chance to look at the other two that I finally got developed. (One of the original three had been exposed when removing it from the camera, so no shots came out of that one.) The results were a bit disappointing. I’m so used to the automatic features of my digital cameras that I forget there’s a lot more to think about with this mostly manual SLR.

It does have some automatic exposure settings. There is auto mode, which picks the shutter speed and aperture. I can also adjust the aperture and it will pick a shutter speed, or adjust the shutter speed and it will pick an aperture. Of course I can also choose both manually. I shot with ISO200 film, so I really had to consider the lighting. If I didn’t get a well-balanced shot, the shoots would either overexpose in spots or underexpose.

When I had the film developed, I had them put the shots on a CD in addition to the 4x6 prints. I was then able to import the shots in to Lightroom and made some adjustments. In total, I was able to come out with 10 or 11 halfway decent shots.

Below are a two examples. You can find more on my Facebook photography page or on flickr.com here:


Taken at the Cumberland Monastery, Cumberland, RI, October 14, 2010
camera: Canon AE-1, lens: Canon FD 35-105mm F3.5, film: Kodak Gold ISO200 35mm
Taken at Clarkville Pond, Pulaski Park/George Washington Management Area, Gloster, RI, October 10, 2010
camera: Canon AE-1, lens: Canon FD 35-105mm F3.5, film: Kodak Gold ISO200 35mm


Saturday, October 2, 2010

Saboten Con

Day 2 of Saboten Con is almost over. I bought a new lens to try out and it's amazing. At previous cons I struggled with the low lighting and ended up with blurry shots or poorly exposed shots. I bought a Canon 50mm f/1.4 for $350 and it is one of the best things I've ever bought for my photography. It's allowed me to get brighter shots with very little motion blur. I love it.

I've already taken a over 2000 shots because I've been shooting in burst mode. I'll have alot to sort through, but hopefully I'll have some really great shots. It'll take a while to get done though. I'll post them as soon as I can.

Wednesday, September 29, 2010

Saboten Con This Weekend - Conventions are fun to shoot at!


This weekend I’ll be at the Saboten Con in Phoenix. This is the second year that my girlfriend, Mary, will be selling her handmade goth accessories at this anime convention. Last year, I only attended the last day of the con with her, but I discovered a great way to occupy myself and improve my photography in between customers.

Anime cons are similar to other conventions (i.e. comic book, sci-fi, Star Wars, etc.) in that the attendees tend to dress up as their favorite character, which is also known as cosplaying. I started taking candid photos last year of people dressed up and I had a great time doing so. Since then I went to two other anime conventions in Tucson with Mary and we briefly attended the Phoenix Comicon.


Cosplayer dressed as Harley Quinn at Saboten Con '09


It’s been quite a challenge taking photos at these conventions because the lighting is usually terrible. I’ve been taking my photography seriously now for two years but my main focus has always been nature photography. Lighting is not as much of a challenge outdoors than it is inside the halls and conference rooms of hotels, where the lighting is generally very low and it’s difficult to get the correct exposure.

I’ve been challenging myself at each convention to show improvement in my work. It’s rather difficult to progress when these conventions take place every three or four months, but I think I’ve been doing fairly well. At the first convention I don’t even think I really considered what I was doing and just used the same techniques I used when I was shooting outside. The second convention was a similar experience but I lucked out because the lighting was much better. After that second convention though, I started to think of ways to improve my shots by using a different shooting mode and experimenting with different ISO settings.


Cosplayer dressed as the Joker wearing Arkham Asylum prisoner outfit and handcuffs at Conichwa '10 in Tucson


Most recently, at the last Tucson convention I focused specifically on increasing the ISO, or light sensitivity. I was really afraid to play with it due to the fact that the more you increase the ISO, the more visible noise you will have in the image. The plus side is that you can get a more accurate exposure. I pushed the ISO up anyway and was only partially happy with the results. When I worked on the images in Adobe Lightroom I tried to fix the noise in the images and ended up doing it a bit too much. The photos came out looking kind of flat.

Fortunately I’ve been reading some books by Scott Kelby that have tips on shooting at weddings. Weddings are probably the closest thing in comparison to conventions as far as the lighting situations go. Weddings tend to take place in churches or reception halls with very low light, similar to the hotels that host these conventions.

A wedding photographer is always taking photos of the event and what’s actually taking place. There are of course the formal photos, but there is a lot of walking around the reception and capturing everything.

I’m not a big fan of posed shots of people cosplaying. I prefer to get the candid shots of them chatting with their friends, or cosplaying and interacting with other characters from that specific anime or video game. To me, that’s the connection I make with wedding photography.

Cosplayers at Animeland TuCon '10 in Tucson


So this weekend, I’ll be trying to use as many of the tips from Scott Kelby’s books as possible and I’m hoping to have the best shots yet. Saboten Con is the largest anime convention in Arizona as far as I know, so I’m expecting a very large turnout with a very large pool of subjects. I’ll be sure to post some shots here as well as on my Flickr and Facebook pages.